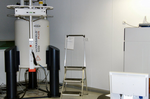
insert tube
Insert the nmr tube in the spinner in such a way that the bottum of the tube reaches the bottom of the spinner adjust holder. Make sure that the nmr tubes are clean on the outside in order to prevent the inside of the spinner and the magnet from getting filthy. Before loading into the magnet, wipe tube and spinner clean once more.
The height of the solvent must be at least 40 mm. Tubes and sample volumes

If the BSMS Control Suite is not on one of the screens click on 1 as shown in figure 1.
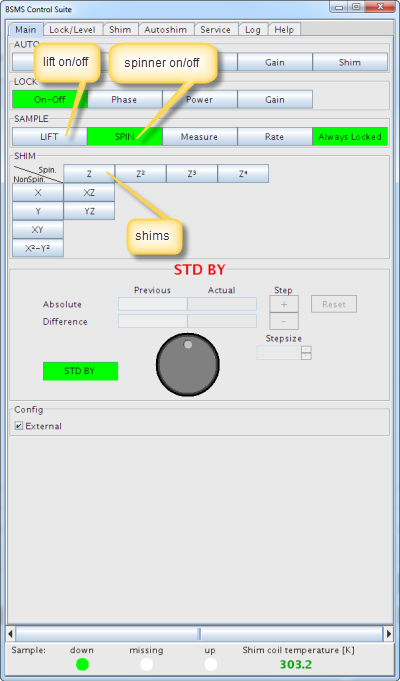
Acivate the lift with the lift On/Off button (see Figure 2 ) and wait until you can hear a airflow. Insert the spinner with the sample into the shaft of the magnet ( do not lean on the magnet ) and press lift On/Off again, the tube will now be transported into the magnet. Wait until in the sample region the led down will be illuminated ( green ) and turn on the spinner by pressing spinner On/Off By pressing Measure the spinning frequency can de checked; it should read 20 Hz.
edc
In order to open a new dataset type edc in the command line or click on icon 3 (new) see figure 1. A dialogue box appears in which you can enter the name and number of the measurement see figure 3. Choose an appropriate name ( e.g your login name which is a unique name ), and the enter a sequential number in the field expno. In the field procno it should generraly read 1.You can leave DIR and Experiment as they are. In the experiment field you can choose an experiment or "use current params" see figure 3.
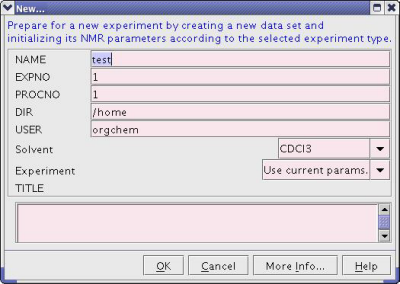
If you choose "use current params" all parameters of the old dataset, in which you gave the edc command, will be taken over in the new measurement. Most convenient is to always use the same name and have the expno increased by 1 for every new experiment. In this way back-ups ara easely made ant the spectra are easy to retrieve. If you use another numbering then there is no guarantee for a correct back-up.
atma
Now we have to tune and match the probe. To do this you give the command atma on the command line. If you are measuring a proton 1D-nmr in a common solvent it is not necessary to tune and match the probe. Tuning the probe
lock
The next step is to lock the spectrometer on the deuterium signal of the solvent. If the Lock Display Window ( figure 4 ) is not visible on one of the screens click on icon 2 as shown in figure 1.
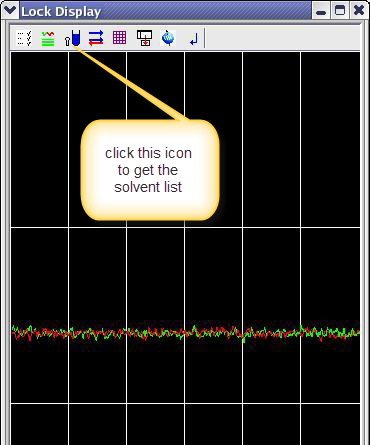
Type lock on the command line or click on the lock icon ( see figure 4 ). A list of solvent appears in witch you have to select the solvent you are using. The spectrometer will now fully automatically lock into the solvent deuterium signal. Below the command line after a while the message check lock shift finisched, appears which means the spectrometer has successfully locked and calibrated.
The field-frequency lock. ( read more...)
ts
Now the spectrometer needs to be shimmed. Type ts on the command line and the TopShim window will appear see figure 5. Click on start to begin the automatic shim procedure.
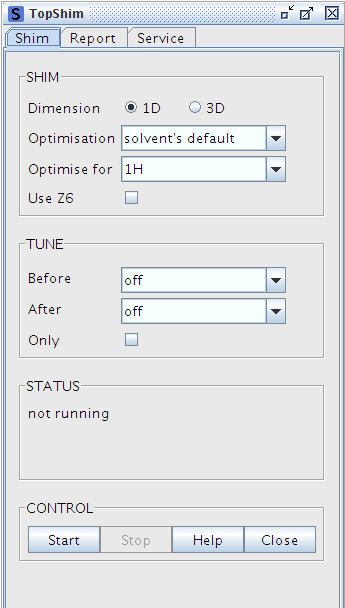
When TopSchim is finished you can see the report by clicking on the report tab in the TopShim window
Optimizing the field homogeneity: shimming ( read more ..... )
manually alter the acquisition paremeters
In order to maneally alter the acquisition paremeters the dialogue of the acquisition parameters figure needs to be actiated by typing eda in the command line or clicking on the AcquPars tab see figure 6

To see the pulse program depended parameters click this ![]() icon
icon
In this dialogue box all the acqusition parameters can be entered.
Explanation of some of the most importent parameters;
| PULSPROG | In this field the pulse program used is indicated. Usually it should be read zg30. The pulse program will be activated when zg is entered in the command line. |
| AQ_mod | Shows the acquisstion mode usually digital quadrature detection. Simultaneous mode that eliminates quad images and O1 spikes. |
| TD | Here the amount of data points in the FID ( frree induction decay ) is entered. Typically 32K is entered here. |
| NS | Number of scans. ( for a valid value see the puls program ) |
| DS | Number of dummy scans. These are used to reach equilibrium in the sample before starting the actual measurement. ( for a valid value see the puls program ) |
| D array | Array contaning the values for D1-D31. These are delays the pulse program uses. D1 is the relaxation delay. |
| SW,SWH | Sweep width of the spectrum. SW given in ppm. SWH given in hertz. |
| AQ (sec) | Acqusition time in sec. ( time necessary to colect the data pionts ) |
| NUC1 | In this field the nucleus to be measured is indicated ( usually H ) |
| O1 | This is the offset frequentie in hertz ( O1 ) or in ppm ( O1P ). O1 is the middle of the spectrum. Exemple if O1P is 5 ppm and the sweep width ( WS ) is 12 ppm the spectrum range will be from -1 ppm to 11 ppm. |
Close the acquisition parameter dialogue box by clicking the Spectrum tab.
RGA
Now the reciever gain has to be determined. The reciever gain function adjust the amplitide of the FID before it is sent to the digitizer. An optimal amplitude must be found to have a maximal FID amplitude without overloading the digitizer ( overloading the digitizer lead to artifacts in the spectrum ).
The most convenient way to determine the receiver gain is by typing rga
( reciver gain automatic ) in the command line. The receiver gain is adjusted automatically and after a few pulses the message rga finished appears.
ZG
Now the measurement can be started by typing zg in the command line. The measurement is srarted and the expected measuring time is displayed in the status window. To see the progress of the measurement the FID and the experiment counter can be viewed in the acquisition mode. This acquisition mode can be activated by clicking on icon 5 in figure 1
After the measurement is compleded the size si of the processed data checked. This can be done by typing si in the command line. The spectrum now can viewed by typing ft in the command line. The spectrum is now shown but it usually is still out of phase. In order to correct the phase of the spectrum type apk in the command line.
In order to take the sample out of the spectrometer fist switch of the lock function and the spinner in the bsms window ( figure 2 ) and then activate the lift. After having taken out the sample switch off the lift and place the spinner in the holder.
The commands in a nutshell
- Click lift ( figure 2 )
- Insert the spinner with the nmr tube on the shaft of the magnet and click lift again.
- Type atma to tune and match the probe. ( if necessary )
- Type lock in the command line and select the solvent.
- Type ts on the commande linbe to shim the probe.
- Click on the acquisition tab ( figure 6 ) and adjust or insert the acquisition parameters.
- Type rga in the command line to adjust the reciver gain.
- Type zg in the command line to start the measurement.
- Type ft and apk to obtain the phased spectrum.
- Click the lock on/off button the spinner button and the lift button ( figure 2 ) to take out the sample.
- Click on lift again and put the spinner in the holder.
Standard parameters
if you want to start from scratch with one of the standard parameter sets, use the rpar command. You will see thr rpar window ( figure 7 ).
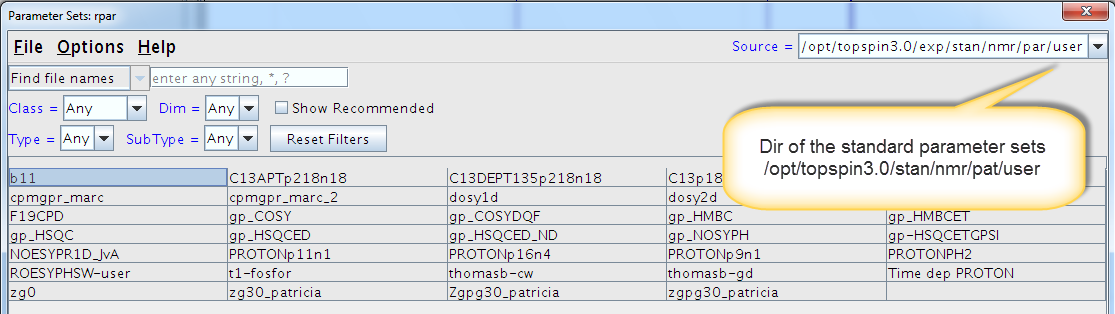
Now you can select one of the standard parametersets and click on read.
Standard shim files
If there are problems with the lock or you have a very poor line shape you can read the vstandard shim file ( figure 8 ).
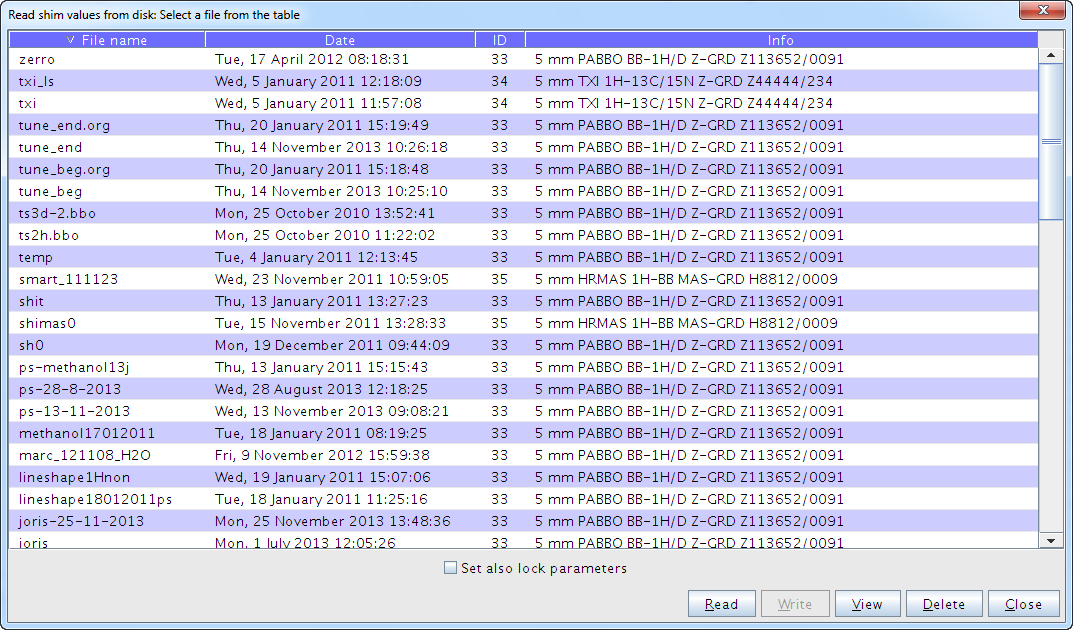
To do this select the file standardshim and click on the read button.
NMR date set
You can download the nmr datasets from the nmr computer. Use a file tranfer program like WinScp.
| For host name use | nmrspectra-srv |
| Username | username |
| Password | your password |